

















HOVERAir AQUA Repair Kit: A Step-by-Step Guide
|
|
Time to read 3.76 min
|
|
Time to read 3.76 min
The intuitive design of the HOVERAir AQUA makes the repair process incredibly straightforward, allowing you to handle minor hardware maintenance right at home. This blog provides a clear, step-by-step guide on how to use the official Repair Kit to replace your propellers, motor guards, and the main protective frame.
Watch the full tutorial video below to see the process in action, or scroll down for our detailed, step-by-step written guide.
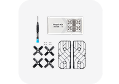
Opening the official AQUA Repair Kit box provides you with the specific parts and tools required for straightforward hardware maintenance. The complete package includes:
Following the designated procedures ensures the flying camera remains perfectly balanced and fully operational for its next flight.
Completing the physical component swaps requires a mandatory final review before you power the device back on. Double-check every single screw you handled during the repair process. Confirming that all fasteners are tightened securely prevents unexpected part detachments mid-air and strictly guarantees a safe flight environment. A quick physical inspection, such as gently shaking the unit to confirm nothing rattles, ensures the overall structural integrity remains perfectly solid.Once you verify the drone is fully flight-ready, gather all the remaining spare parts. Place the extra propellers, leftover screws, and the custom screwdriver directly back into the original box. Storing these items properly keeps your gear organized and ensures these specific tools remain easily accessible, leaving you perfectly prepared for any future hardware maintenance.
Routine maintenance directly extends the lifespan of your flying camera and ensures reliable performance during your outdoor excursions. Keeping the official Repair Kit on hand allows you to quickly address minor wear and tear without interrupting your travel plans. Equip yourself with the proper replacement parts today, so your drone always remains in optimal condition to capture smooth, high-quality aerial footage.
Latest Articles

Most drones handle the sky beautifully, but they become fragile the second they encounter a lake or a heavy splash of sea spray. If you want to know what kind...
Most drones handle the sky beautifully, but they become fragile the second they encounter a lake or a heavy splash of sea spray. If you want to know what kind...

Ever searched for a drone that can automatically follow your kayaking trips? If you ask around, most people will tell you it's impossible without a skilled pilot on the beach...
Ever searched for a drone that can automatically follow your kayaking trips? If you ask around, most people will tell you it's impossible without a skilled pilot on the beach...

The HOVERAir AQUA has been designed with the water fully in mind. In addition to the technical challenges of creating a fully waterproof drone under 250g, we also carefully considered...
The HOVERAir AQUA has been designed with the water fully in mind. In addition to the technical challenges of creating a fully waterproof drone under 250g, we also carefully considered...

HOVERAir VERSA combines handheld filming and self-flying capture in one compact device. This guide covers everything you need to get started, from setting up your VERSA to capturing your first...
HOVERAir VERSA combines handheld filming and self-flying capture in one compact device. This guide covers everything you need to get started, from setting up your VERSA to capturing your first...

The standard advice for filming a solo water session is always the same: skip the drone and buy a 360 camera on a long stick. Until recently, that was the...
The standard advice for filming a solo water session is always the same: skip the drone and buy a 360 camera on a long stick. Until recently, that was the...

The Beacon and JoySticks serve as HOVERAir's all-new remote control solution, fully compatible across our entire lineup—from the X1 and X1 PRO/PROMAX to the AQUA. Acting as a unique tri-state...
The Beacon and JoySticks serve as HOVERAir's all-new remote control solution, fully compatible across our entire lineup—from the X1 and X1 PRO/PROMAX to the AQUA. Acting as a unique tri-state...
